Magento 2 Guide How to Make Third-party Elements Implementation 5 Times Easier
20.07.2016

There is one magic tool that simplifies development on Magento 2. We recommend remembering its name, because today we are giving kudos to one and only - the 'Composer'. Composer is a dependency manager for PHP that allows you to declare the libraries your project depends on, and it will manage (install/update) them for you. Sometimes Composer is referred to as the library manager since this is how it works in general, but when used for some definite local project, Composer becomes a Dependency Manager.
When comparing Magento 2 and Magento 1, you can see that the last one has quite an inflexible structure. Shift from Magento 1 to Magento 2 can be compared to the fall of the Berlin Wall in 1989, where Pink Floyd gave their famous concert. Magento 1 is perceived as a monolith structure where each module is like another brick of the solid wall. In Magento 2 all modules are separated and independent like bricks of the broken wall, except for the modules that are marked as “dependent” in the configuration. So the Composer helps to crash the unbreakable wall.
Now, due to the Composer you can create custom Magento configuration, throw away all the unnecessary modules and install third-party libraries. All files related to modules (even templates) are placed in the corresponding modules. Everything you have to do is just to include Composer into the Magento configuration.
So, a new era of developer's laziness has officially started and it's called Composer-ing! YAY! ) Nowadays there are a lot of ready-to-use solutions that can be implemented by the means of Composer. You don't need to invent a bicycle! Just take and you are ready to go!
- Composer downloads and updates third-party libraries (vendor and lib folders), checks for new versions, etc.
- Autoload.php is composer based on all composer.json of all dependencies. It generates class map and creates autoload for the project. Magento 1 is doing it in real-time mode, while Magento 2 is pre-generating it due to the composer.
- Composer resolves conflicts of libraries and priorities.
- Additionally, it finds and downloads correct versions of libraries into the project.
- One of the most important benefits gained from combining Magento 2 and Composer is a set of autoload capabilities for libraries that simplifies usage of third-party software solutions dramatically. Composer provides the ability to use third-party libraries, so that you don’t have to bundle them with source code of Magento 2.
- Offers a component-based architecture, as well as reliable dependency management.
- Reduces extension conflicts, as well as various compatibility issues.
- Streamlines your work with versioned dependencies.
- Introduces semantic versioning.
- Supports some useful standards, such as PHP Framework Interoperability.
- Magento 2 uses Symfony components, such as Symfony console and event dispatcher. Thanks to Composer again and again.
- First of all, you can easily install Magento 2 via Composer. If you still haven’t run Magento 2, it’s a magic sign that you should give it a try.
- With Composer you can implement third-party libraries and modules.
There are 2 ways to install an extension on Magento 2:
1 - download an extension from the marketplace and handle it manually (copy the code and perform other necessary actions)
2 - use a special official Magento plugin: Magento-composer-installer Here we would like to focus on the second solution. It is a real time saver as with just ONE line of code it places your new module in the required folder. Just type the name of new module in the Composer and it will transfer it for you.
-
Enter in command prompt:
composer --helporcomposer list --helpIf the command displays the list of possible variables, that means that Composer is already installed. -
To install the Composer: Change to or create an empty directory on your Magento server. And enter:
curl -sS https://getcomposer.org/installer | php mv composer.phar /usr/local/bin/composer
Avaliable Composer packages in Magento 2 For packages of the following type:
- magento2-module code inserted into app/code
- magento2-theme code inserted into app/design
- magento2-language code inserted into app/i18n
- magento2-library** code inserted into lib/internal
- magento2-component code inserted into root of magento installation
Composer.json -> “TYPE” = ... Put the name of your new module and its “version” into the command line
bash-4.3$
bash-4.3$ composer require vendor/module:version
bash-4.3$ *** some magic ***
bash-4.3$ Done.
bash-4.3$
And it will be installed!
If you omit the version it’ll install the latest one.
Also, Composer will check compatibility of modules and install a compatible one. Seriously, it’s a gift from above!
Composer independently verifies whether the system (php version, etc.) is suitable for installation.
** Composer works as a security guard in the shopping mall or nightclub, performing all those “face control” verifications for you. In case if any system component doesn’t meet some specific requirements, Composer will recommend to update the component and it won’t let Magento or Magento module to install. Previously, all these checks were performed by the Magento core. ** Patch for ver 2.0.1
So, when you create a new module, you can insert suitable version in the configuration of your module. For example, you can specify that your module can run only with Magento 2.0.1 version and Composer will refuse to install this module in older or newer Magento versions.
Your trick can fail if you don’t know magic secrets though. So what configuration do you need to run magic and for Magento-composer-installer to install your new module?
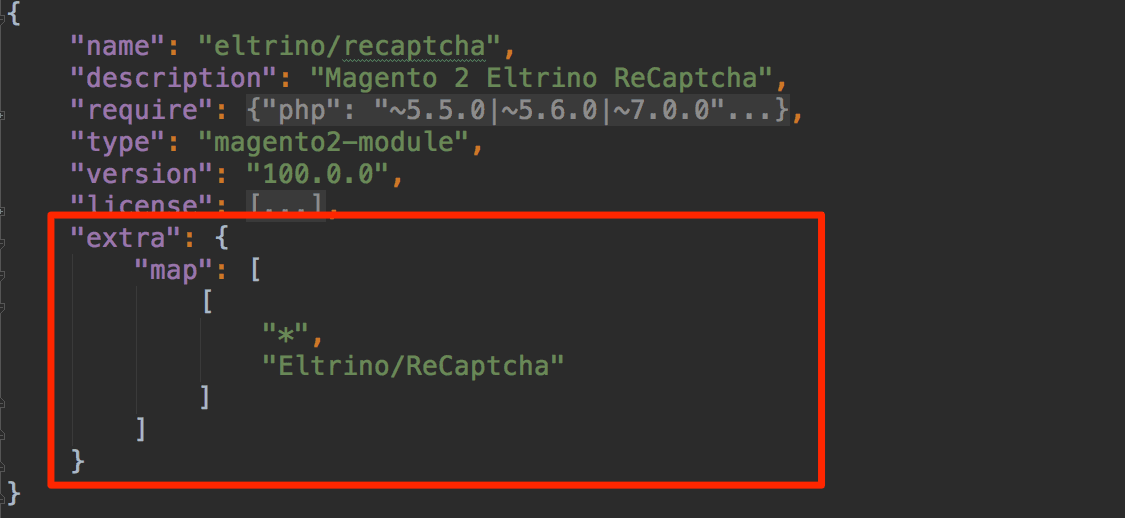
Pay attention to the line TYPE.
It definitely must be equal to “MAGENTO2-MODULE”; otherwise, Composer will simply ignore it.
The next accent point is “mapping”. You have to input all files from repository to Magento code folder - in our example it is Eltrino/recaptcha. We’ll consider Google ReCaptcha

Search and install the necessary libraries
http://packagist.org - it’s your magic store with tricks stuff where you can find all third-party libraries available (suitable) for Composer and effortlessly implement them into your project. If you need Recaptcha, search for it and install it: it is ready to use, so there is no need to spend hours on coding.
There are about 100 Recaptcha packages. We choose official one, developed by Google google/recaptcha and install it.
bash-4.3$ composer require google/recaptcha
bash-4.3$ *** some magic ***
bash-4.3$ Done.
As a result, we get third-party library implemented definately in our Magento Existing complications in creating modules for Magento 2:
- Building structure from scratch way too long
- The use of simple modules (module skeletons) deprecated
- ihb/moduleCreator ok. https://github.com/ihb/ModuleCreator is a module that creates samples or skeletons of modules.
There are also alternative modules and Magento hasn't launched official one yet. Add repository url to the root composer.json file example: ihb/moduleCreator:dev-master
bash-4.3$
bash-4.3$ composer require ihb/moduleCreator:dev-master
bash-4.3$ *** some magic ***
bash-4.3$ Done.
bash-4.3$
bash-4.3$ bin/magento setup:upgrade
How to use a new module?
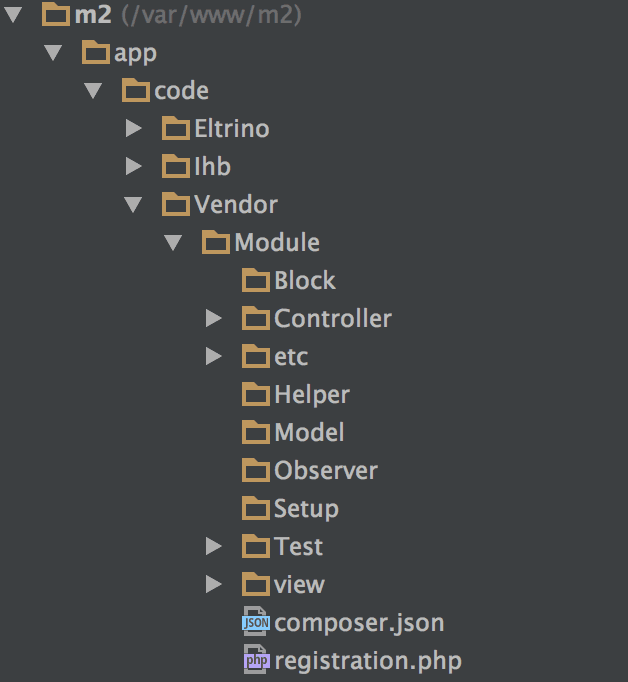
After the Module Creator is activated, just run php -f bin/magento ihb:module-create Vendor_Module command. This will create simple module structure in app/code/Vendor/Module folder.
bash-4.3$
bash-4.3$ bin/magento ihb:module-create Vendor_Module
bash-4.3$
bash-4.3$ bin/magento setup:upgrade
The structure of the new module
Here is the generated structure of the new module.
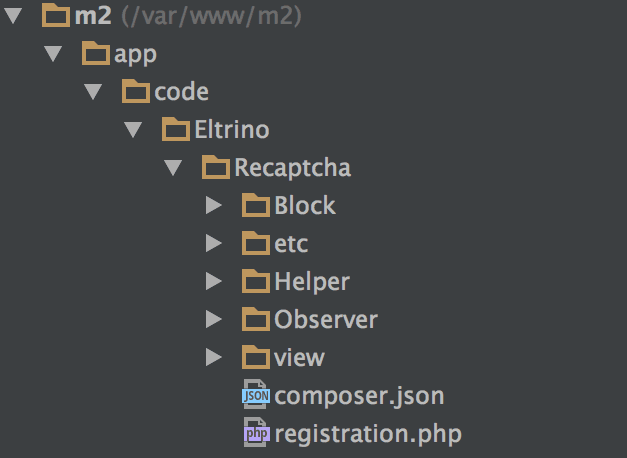
You need to rename folders and delete the unnecessary ones.
Add captcha output to contact form
magento2/app/code/Eltrino/ReCaptcha/view/frontend/layout/contact_index_index.xml
 magento2/app/code/Eltrino/ReCaptcha/view/frontend/templates/captcha.phtml

1 When we've got the module structure ready, we can insert captcha output in our contact form. For doing this we have to create output files required by captcha. It's a “layout” file, in which we are going to define our template right after the contact form output.
2 You can easily find a template at https://github.com/google/recaptcha or http://www.google.com/recaptcha/intro/index.html Just copy and paste the code and it will work great!
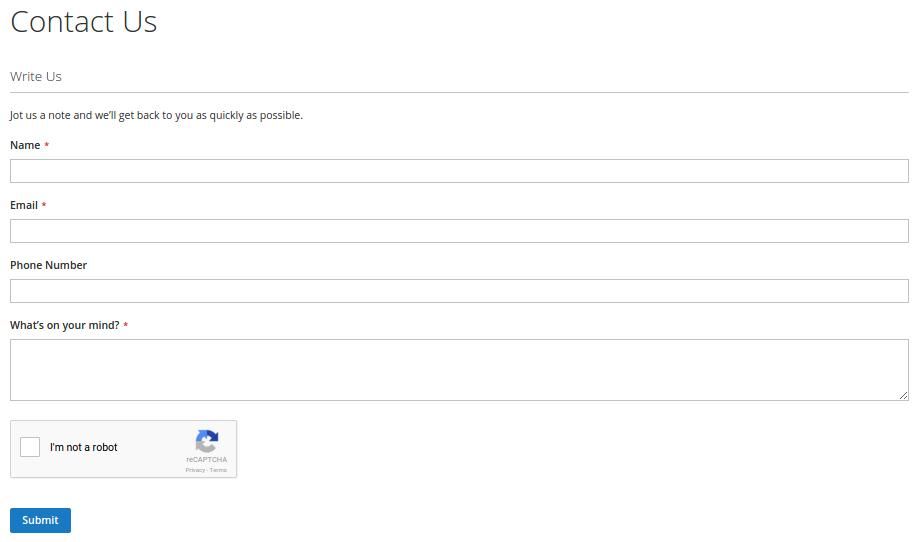
As a result we are going to see the captcha but it won't work. To make it alive we need to embed validation on the backend. To accomplish that we are going to use the Observer pattern and Magento events.
Before saving data from the form, we need to validate the captcha code.
In order to get that done we create Predispatch Observer:
magento2/app/code/Eltrino/ReCaptcha/etc/events.xml
 While the majority of basic mechanisms remain the same as in Magento 1, there are several significant differences in Magento 2:
- Each observer is in its own class. You no longer have an entire observer class that holds all observer code.
- Observers are in their own folders. You do not put observers in the model folder anymore. They are located in the Observer/ folder in your module.
- Observer XML is located in the events.xml file. A common trend among Magento 2 is to separate all XML according to functional destiny. This means that all XML is separated according to its purpose. All events go in their own XML files. All controller routes go to another one and so on.
- Observers in Magento 2 use Symfony event dispatcher
- Separation by area is done by placing event .xml file into specific folder. For example, etc/events.xml for all areas, etc/frontend/events.xml (for the frontend), etc/adminhtml/events.xml (for the backend), etc.
In general, there are less events in the code and alongside with events, the so-called plugins are also introduced and used in Magento 2. ReCaptcha/ReCaptcha - is our third-party library that we’ve just installed. Bring to notion that to check Captcha we need just 2 lines of code.

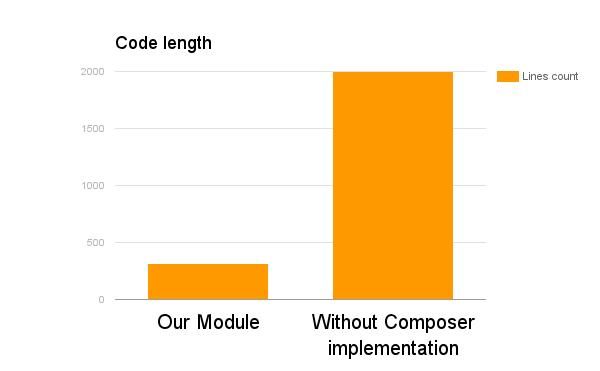
There are just 314 lines in our code, in embedded third-party library - 1670. So, without using the composer, to implement the recaptcha feature into the contact form, we need to create around 2000 lines of code. Now let’s do some math:
- 314 lines equals to 2-3 hours of development
- 2000 lines of code is around 12-18 hours
Composer makes implementation of third-party elements in Magento 2 no less than 5-times easier! What is more, you get light, clear code and save 10-15 hours.
But, don't relax! Even if you move Magento between minor versions you need to test your upgraded store.